
NetX™ CloudConnect™ Communications Wi-Fi Step-by-Step Installation Guide
ATTENTION: DO NOT INSTALL the thermostat until you have all the necessary network information. See the list in Step 1 for X-Series Wi-Fi thermostat network information requirements.
Step 1 Get Your Network Information
To set up a CloudConnect™ configuration you will need the following information for a Wi-Fi install.
- SSID
- Wi-Fi Password
- Security Type
Confirm your network information. If you do not already know this information, you can log on to your router and retrieve it. The SSID and Security Mode will be listed in the wireless settings and the DHCP range will be listed in the DHCP settings area. Alternatively, the label on your router may list the router’s IP address, Security Mode, Password, etc.
Step 2: Install The Thermostat
Turn off the power to the HVAC unit and follow the detailed instructions included found here. Make sure the wires are connected to the correct terminals. Before continuing to the next step, make sure the thermostat faceplate is properly installed according to the installation instructions.
STEP 3 Enter SoftAP Mode - First-Time Power-Up
On initial power-up or if the thermostat networking has not been configured, the thermostat will start in SoftAP mode. It will remain in SoftAP mode until the thermostat is rebooted with properly configured Wi-Fi credentials or no activity is detected on the thermostat for 10 minutes. You will know if you are in SoftAP mode when the following conditions are met:

- The Dot Matrix display reads Join NetX-XXXXXX where XXXXXX is the last 6 characters of MAC ID
- The Wi-Fi icon and the lower right button will be flashing in 1-second intervals. (Green highlighted areas)
Pressing the lower right flashing button at this time will exit the SoftAP mode without saving any network configurations.
NOTE: For security purposes, SoftAP is active for only 10 minutes with no activity. If the thermostat drops out of SoftAP mode, see the Troubleshooting: Thermostat Reset Modes section below and initiate a 'Network Reset'. This will restart SoftAP.
NOTE: If the thermostat is LOCKED, you will be required to UNLOCK (either permanently or temporarily) the thermostat before SoftAP commissioning is allowed. When LOCKED, none of the SoftAP commissioning icons above are turned on and the thermostat continues to operate 'normally'.
Step 4: Connect To The Wi-Fi Thermostat Using ‘SoftAp’ Mode & Setting Local Wi-Fi Network
If your computer is connected to the internet with an ethernet cable, it is recommended to temporarily disconnect this cable during this step. Using any Windows PC, Apple Computer, or smartphone with a Wi-Fi radio and a web browser, search for the Wi-Fi network with the SSID name NetX-XXXXXX that matches the Dot Matrix Display.
Connect to the NetX-XXXXXX network. This is an open network and does not have a password. It may take up to a full minute for your computer to connect to the thermostat.
Use any current release browser (Chrome, Firefox, or Safari) to navigate to 192.168.7.1. This is the SoftAP address for the thermostat.
TIP: For information on an extra step needed for using SoftAP on android devices, click the link below.
https://networkthermostat.com/app-notes/soft-ap-android-tips
When the device connects to the thermostat, the screen below will be displayed in the browser.
STEP 5: Enter your Wi-Fi Network Information:
- On the top of the screen click “Scan for Networks”.
- A list of available Wi-Fi networks will appear.
- Select your network.
- The Security Mode will be automatically selected.
- Enter the wireless network's Pass Phrase. If your network uses WEP, it will be necessary to know the length of the Pass Phrase and if it is ASCII or HEX.
NOTE: WEP networks have significant security vulnerabilities and are easily hacked. It is recommended that WPA or WPA2 network security mode be used.
By default, “Enable DHCP will be checked. Unchecking the box will expose the parameters required for static IP operation.
Click 'Save & Reboot'. Depending on the type of wireless network, it may take up to a few minutes to make a secure network connection.

NOTE: After clicking “Save & Reboot” the thermostat will reboot while displaying the following flashing at a 1-second interval:
- Dot Matrix - “Waiting… “ blinking
- Wi-Fi Icon blinking
- Bottom right button blinking
(Green highlighted areas are blinking)
If the network parameters are accepted, for 5 seconds you will see “Wi-Fi Connected” on the Dot Matrix and the Wi-Fi icon illuminated. After 5 seconds, the thermostat will return to the normal display.

NOTE: If you experience either Wi-Fi or DHCP failure, refer to the Troubleshooting section at the end of these instructions.
Step 6: Reconnect Your Computer To Wireless Network
While the thermostat is rebooting (it will only take a few seconds), use your set up device’s network settings to connect to the wireless network (SSID) using the password credentials used in the network setup.
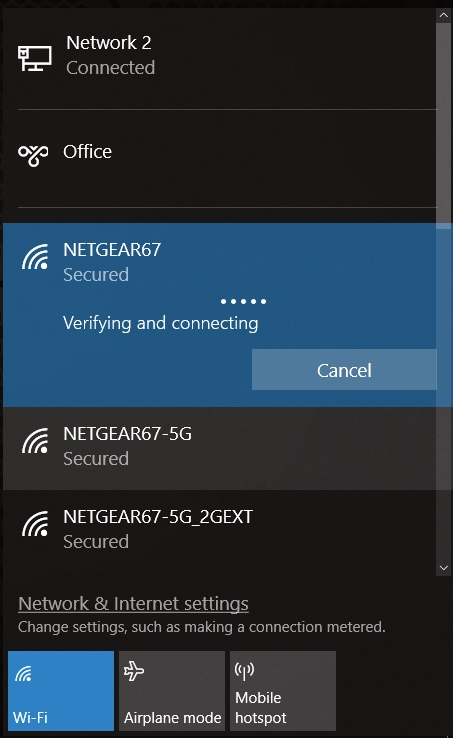
The screenshot above shows typical PC wireless networks. In this case, the thermostat network has the SSID name NETGEAR67. When the thermostat is properly connected to the wireless network, the Green LED will be on steady (indicating the thermostat is connected to the network you selected).
TIP: If a hardwire ethernet cable was removed in Step 4, it can be plugged back into the computer now.
Step 7: Retrieve Your IP address Via the Faceplate
The IP address can be retrieved from the faceplate of your thermostat by accessing the Installer Menu.
With an unlocked faceplate (the lock icon is not on), press and hold the Menu Icon for 5 seconds to enter the Installer Menu. Do not release the Menu button until the Installer text displays in the Dot Matrix of the faceplate.

Next, press the hidden button, located to the left of the Checkmark button. This will retrieve the device name. The device name will be displayed in the Dot Matrix of the faceplate.

- Use the Checkmark button and the Return button to switch between the Thermostat Name, IP Address, and MAC Address. WRITE DOWN THE IP ADDRESS. To exit the menu, tap the Cancel button at the bottom right of the display.

HINT: Use the Checkmark and Return buttons are denoted by the red arrows.

HINT: Use the Checkmark and Return buttons are denoted by the red arrows.
Step 8: Configure Credentials
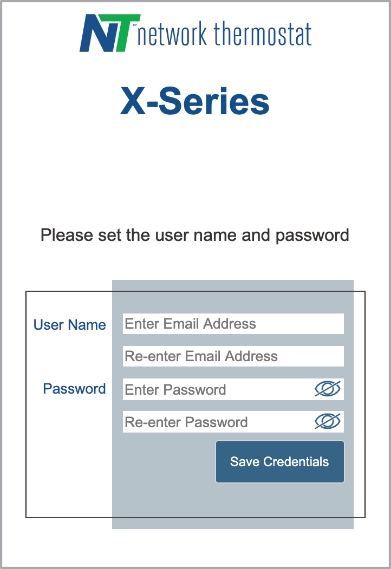
Enter the IP Address in your browser, then enter your username (a real email address) and password for the thermostat. Click on the “Save Credentials” button to save your information. You will be taken to the login page for the thermostat. For CloudConnect™ configuration go to the URL in the next step.
Step 9a: Connect To Your Thermostat Using NetX™ CloudConnect™ Service
Using a desktop browser, go to the URL https://netx-cloud.com. Log in with the same username and password you used in Step 8.
OPTIONAL For connections to the thermostat's embedded webserver, go to Step 9b.
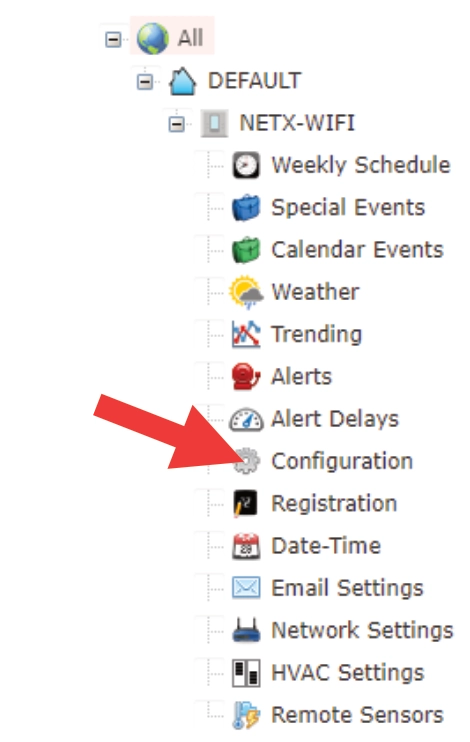
Once logged in, you will see a dashboard with your thermostats on the right and a drop-down menu on the left. Expand the menu under “New Site” and “Default.” Expand the thermostat (click the ‘+’ to the left of the thermostat name) and navigate to the Configuration page. Go to Step 10 for Configuration.
NOTE: Thermostats are automatically enrolled with free CloudConnect™ for 30 days.
NOTE: For more information on CloudConnect™ contact us at https://networkthermostat.com/contact for more information.
Step 10: OPTIONAL - Edit your Thermostat Configuration

- Enter a unique descriptive name in the Thermostat Name box
NOTE: Thermostat names may have a maximum length of 15 characters with no spaces.
- Click the Apply button for the thermostat name to be saved.
- Enter the Site Name.
- Enter your address with your Zip Code. Adding the Zip Code allows the thermostat to access your current weather and forecast information)
- Click the Apply button.
- Make any additional adjustments as needed.
ATTENTION: Make sure to click the appropriate Apply button located in the same block as the parameters you have adjusted. The thermostat will not update its parameters unless the appropriate Apply button is clicked.
Step 9b: OPTIONAL - DirectConnect™ Installations
(Non-Cloud Applications)
If you decide you don’t want or need the CloudConnect™ service, move your thermostat to a static IP address or use DHCP Reservations on your Router. Navigate to the Network Settings page on the thermostat’s embedded web server to make the changes needed. Refer to an IT professional to help with this if needed.
Troubleshooting
A NOTE: If you experience either Wi-Fi or DHCP failure, power off the thermostat and start the process again.
Wi-Fi Failure

- Dot Matrix - “Connection Failed… “ on solid
- Wi-Fi Icon blinking
- Bottom right button blinking
- The thermostat will reboot into SoftAP mode
(Green highlighted areas are blinking)
DHCP Failure

- Dot Matrix - “DHCP Failed… “ on solid
- Wi-Fi Icon blinking
- Bottom right button blinking
- The thermostat will reboot into SoftAP mode
(Green highlighted areas are blinking)
Thermostat Reset Modes
There are four (4) types of 'resets' incorporated into X-Series Wi-Fi thermostats. The reset modes are accessed by entering the Installer Menu on the thermostat faceplate. With an unlocked faceplate (the lock icon is not on), press and hold the Menu Icon for 5 seconds to enter the Installer Menu. Do not release the Menu button until the Installer text displays in the Dot Matrix of the faceplate. Once there, press the right-side checkmark button until you reach the “Exit Menu” section of the Installer Menu. Using the Up and Down buttons you can access the different thermostat reset levels. Refer to the list below to select the appropriate one for your situation.
● Network Reset: Resets the Wi-Fi (network) information to SoftAP so the thermostat can join a network. Accepting this reset will return the Network Settings to thermostat defaults. User Info and HVAC Controls will remain unchanged.
● User Info Reset: Resets all User information except the HVAC Controls. Accepting this reset will return the User Info to factory defaults. HVAC Controls and the Network Settings will remain unchanged.
● HVAC Reset: Resets all HVAC Controls. The number in the Clock Position displays the number of times the microprocessor has rebooted since the last Factory Reset. Accepting this reset will return the HVAC Settings to thermostat defaults. User Info and Network Settings will remain unchanged.
● Factory Reset: Reset the entire thermostat back to factory defaults. The number in the Clock Position displays the number of times the microprocessor has rebooted since the last Factory Reset. Accepting this reset will reset all settings in the thermostat and additionally will clear the internal Datalog and the number of times the thermostat microprocessor has rebooted since the last Factory Reset.
NOTE: Factory reset is best used if moving a thermostat to a different location. Take care in using this option as the datalog information cannot be recovered.