Setup your NetX™ Thermostat for Connection from the Internet
To set up your permanent connection to your thermostat from anywhere in the world,
follow the instructions below.
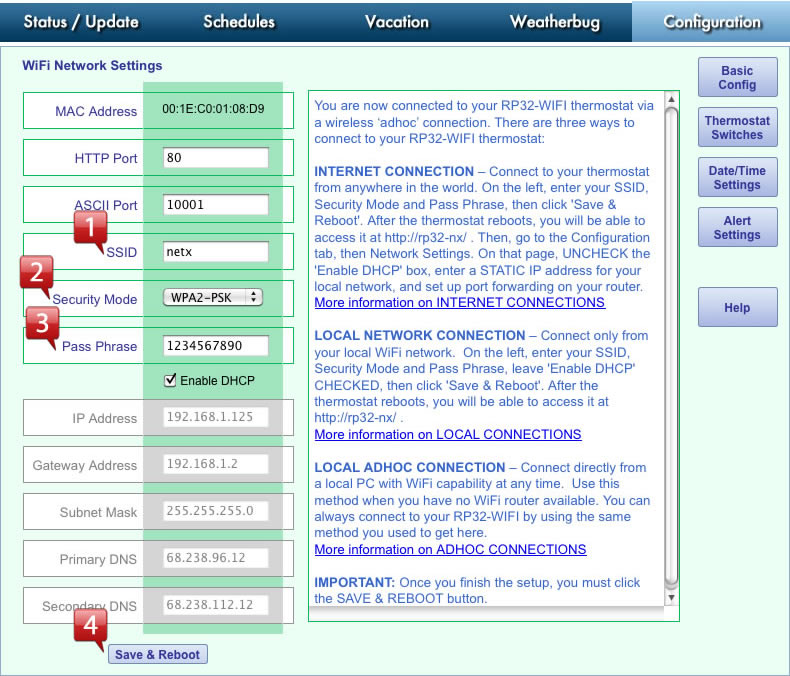
STEP 1: CONNECT TO YOUR WIRELESS NETWORK
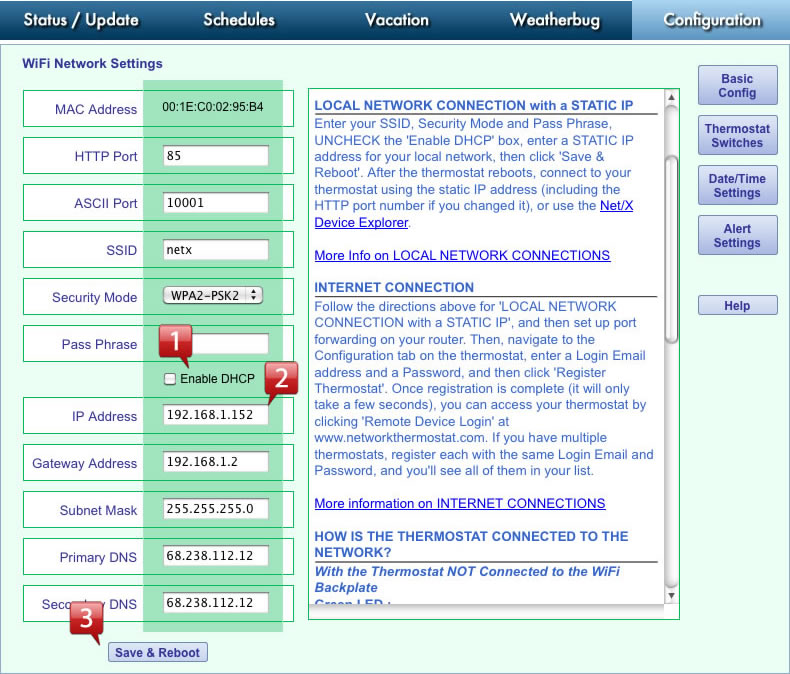
On the left side of the screen, enter your
![]() Wireless network's SSID,
Wireless network's SSID,
![]() Wireless network's Security Mode,
Wireless network's Security Mode,
![]() Wireless network's Pass Phrase,
Wireless network's Pass Phrase,
![]() Then click 'Save & Reboot'.
Then click 'Save & Reboot'.
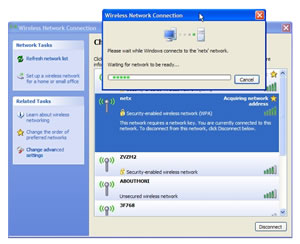
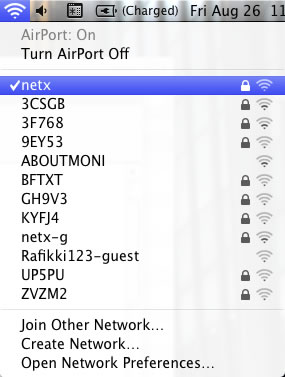
STEP 2: RECONNECT YOUR COMPUTER TO YOUR WIRELESS NETWORK
While the thermostat is rebooting (it only take a few seconds), go back to your
computer's Network Settings, locate your wireless
connection, and reconnect to
your regular wireless network. (This will be the SSID and password that you just entered).
The screen shots below show typical PC and Mac wireless network dialogs
Once you have reconnected to your wireless network, start the Net/X Device Explorer™.
If you haven't installed this utility,
download it from the website at:
Windows version: http://www.networkthermostat.com/software/netx-explorer-pc. Install and launch it.
Mac version: http://www.networkthermostat.com/software/netx-explorer-mac. Install and launch it.
The Device Explorer will run on any Windows PC and allow you to see and connect to
any of your NetX Devices on your
local network, using only your browser.
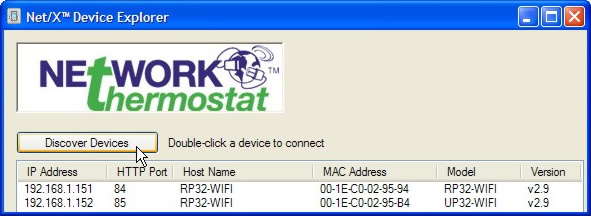
After launching Device Explorer, click on the 'Discover Devices' button, and when the
replies appear,
double-click on the thermostat to
go to the thermostat's main page.
STEP 3: CHANGE THE RP32-WIFI TO A STATIC IP ADDRESS ON YOUR LAN
Click on the Configuration tab, and then click the
Network Settings button
![]() On the Network Settings page, UNCHECK the 'Enable DHCP' box
On the Network Settings page, UNCHECK the 'Enable DHCP' box
![]() Enter a STATIC IP address for your local network. If you don't know what IP address
you can use, you'll need to go to log in to your
Enter a STATIC IP address for your local network. If you don't know what IP address
you can use, you'll need to go to log in to your
router and see where the DHCP range is set.
Select an available IP address that is OUTSIDE of the DHCP range. It can not be one
that
being used by
any other device/computer on the local area network.
(Do not change any of the other settings; Gateway, Subnet, Primary & Secondary DNS.
These items have been automatically pre-filled
to work with your network settings.)
![]() Then click 'Save & Reboot'.
Then click 'Save & Reboot'.
STEP 4: SET UP PORT FORWARDING ON YOUR ROUTER
Port Forwarding is a term used in the networking world which is simply the process of translating one address to another.
The 'Internet' uses an addressing system (IP addresses and Ports) that is in the public domain. Your LAN is your private network with
its own addressing (IP addresses and Ports). Port forwarding allows the Internet and LAN addresses to get translated through the router
so connections can be rerouted from the public side (Internet)
to the private side (your LAN). This is not a complicated task, and the
simple steps below will take you through it. If you'd like to read
more technical details, please feel free to read the wikipedia article on
port forwarding at http://en.wikipedia.org/wiki/Port_forwarding .
Net/X has partnered up with the leading port forwarding company,
PortForward.com, giving you simple instructions and pictures for
setting up your router properly.
![]() Log into your router using the router's name and password. If you don't know the user name and password, there is a huge router
Log into your router using the router's name and password. If you don't know the user name and password, there is a huge router
Username & Password list at http://portforward.com/default_username_password/ . These are the DEFAULT entries given by the router
manufacturers.
![]() In a separate browser window, go to http://portforward.com/cports.htm and scroll down the list until you find
In a separate browser window, go to http://portforward.com/cports.htm and scroll down the list until you find
NetX RP32-WIFI Thermostat and click the link.
![]() Then, locate your router in the list and click the matching model number. You can then either have the team at portforward.com set
Then, locate your router in the list and click the matching model number. You can then either have the team at portforward.com set
up your router for you, or you can click 'skip this advertisement' in the upper right corner to continue to step-by-step instructions.
In the example above, the thermostat is set to the local IP address 192.168.1.152 and port 85. After your port forwarding set up is
complete, any connection from the Internet to Port 85 on your Internet address (DSL or cable modem address assigned by your Internet
Service Provider) will be routed to the local address of 192.168.1.152, port 85.
STEP 5: RECONNECT TO YOUR THERMOSTAT AND CLAIM IT
Now that you have a permanent location for your RP32-WIFI, and you've set up port forwarding, you can access it at
either the static
IP address you assigned above, or using the NetX Device Explorer. (It's the same location on your network.)
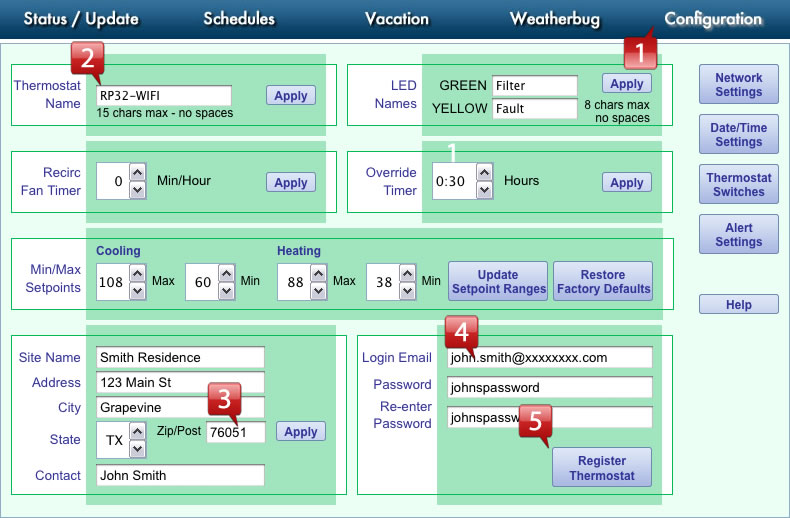
![]() Click on the Configuration tab. You will be at the Basic Configuration page.
Click on the Configuration tab. You will be at the Basic Configuration page.
Enter AT LEAST the following information:
![]() Thermostat Name (use a more descriptive name for your thermostat)
(click 'Apply')
Thermostat Name (use a more descriptive name for your thermostat)
(click 'Apply')
![]() Zip Code (this allows the thermostat to access your current weather and forecast information), (click 'Apply')
Zip Code (this allows the thermostat to access your current weather and forecast information), (click 'Apply')
![]() Login Email & Password
Login Email & Password
![]() Then, to claim your thermostat, click 'Register Thermostat'. The thermostat will briefly,
securely, connect to the NetX
Remote
Then, to claim your thermostat, click 'Register Thermostat'. The thermostat will briefly,
securely, connect to the NetX
Remote
Login Server and store the necessary information
so you can
always find your thermostat(s), even if you don't
have a
static IP address from your ISP. When this process is complete (usually only a few seconds),
you'll see a message that
reads 'Claimed'. You're done!
STEP 6: CONNECT TO YOUR THERMOSTAT USING NETX REMOTE LOGIN SERVICE
Now that you're all set up, you can use any current release browser (Firefox, Internet Explorer,
Safari)
to connect to your thermostat(s). Simply go to www.networkthermostat.com and
click Remote Device Login. When you log in with your user name (email) and password,
you will see a list of your thermostats. Just click the one you'd like to work with, and you'll be
automatically redirected to your thermostat.